SkyTrak Golf Launch Monitor FAQs & SpecsUpdated 6 months ago
Table of Contents
SkyTrak Golf Launch Monitor FAQs
SkyTrak Golf Launch Monitor Specs
SkyTrak Golf Launch Monitor Tech Support
SkyTrak Golf Launch Monitor FAQs
What are the steps for setting up my SkyTrak?
You can set up SkyTrak in just 4 steps!
1. Charge your SkyTrak
Connect the Micro-USB charging cable to the charging port on the side of the SkyTrak; the bottom LED light will illuminate yellow indicating the unit is charging. Make sure to charge your SkyTrak for at least 6 hours prior to first use.
When the unit is fully charged and ready to operate, the bottom LED light will turn off.
- SkyTrak's Lithium-Polymer rechargeable battery can operate for up to 5 hours after being fully charged.
- It's a good idea to keep your SkyTrak unit charged. Fully draining it can reduce the long-term life of the battery.
- Three red LED lights indicates that the battery is critically low and should be charged immediately.
- The SkyTrak may be connected to a PC via full USB to Micro USB cable (Included). This allows the computer to run a constant charge to the unit for all day use.
2. Download the SkyTrak App to Your Device
- iOS users—download the free SkyTrak App Software in the Apple App Store
- Android users—download the free SkyTrak App in Google Play
- PC users—download the SkyTrak PC application here
3. Register your SkyTrak launch monitor
Your new SkyTrak includes a 30-day trial in order to play with your SkyTrak right out of the box. The complimentary trial period gives access to practice sessions and basic settings. After the trial period you will need to complete the registration process and sign up for a SkyTrak membership plan that best suits your needs.
- Open the SkyTrak app and sign in with your SkyGolf account username and password. If you do not already have a SkyGolf account, choose the “Create Account” option.
- Your SkyTrak will need to be in Network Mode in order to complete the registration.
- Select the profile menu from the top right corner.
- Select “About.”
- Select “Register Device” button.
- Select “Yes, Register My Device.
- After receiving the message that your device is successfully registered, select done.
Note: Once SkyTrak has been connected with the software on your device, all 3 LED's will turn green and you will see the red laser dot appear on your desired hitting surface.
4. Pair SkyTrak with your Device (iPad or PC)
iPad Users:
You can pair your SkyTrak to your iPad in one of two ways:
1. Through a Direct Wi-Fi connection
Follow the instructions in the SkyTrak software application to pair your iPad directly to SkyTrak via its Wi-Fi signal. Your iPad will NOT have an internet connection when connected like this.
2. Through a Home Network Connection
SkyTrak can use your Wi-Fi home network to pair with your iPad by connecting to your wireless network router, just like your other devices do. The SkyTrak unit will communicate with the software on your iPad through the router. And you will still be able to access to the internet on your iPad.
PC Users:
You can pair SkyTrak with PC in one of three ways:
1. Via a Direct Wi-Fi Connection on PC
Click on the Wi-Fi signal icon on your PC and select SkyTrak from the drop-down menu, click connect.
2. Via a Direct USB Cable Connection
Connect the micro USB cable to the SkyTrak device and a USB port on your PC
3. Via a Home Network Connection
SkyTrak can use your Wi-Fi home network to pair with your PC by connecting to your wireless network router, just like your other devices do. SkyTrak will communicate with the software on your PC through the router. And you'll still have access to the internet on your PC.
How do I connect my SkyTrak to a projector?
For iPad:
- Use a Lightning Digital AV Adapter with HDMI cable to connect your iPad directly to your TV or projector
- Use an Apple TV or another AirPlay capable device. On your iPad, open the Control Center and choose AirPlay. Then select Apple TV and the iPad display will be transferred to the TV or Projector
For PC:
- Use an HDMI cable to connect from your PC directly to your TV or Projector
Where do I place or how do I align my golf ball?
- Make sure SkyTrak is raised level with the hitting surface.
- Place SkyTrak parallel to your intended line of play. Depending on your set up, this may mean your target is not the center of the net.
- Once SkyTrak is properly connected to the app on your mobile device, it will display a red laser dot on your hitting surface. Place a clean, white golf ball on the red dot.
- The intended target line should be parallel to the SkyTrak for accurate shot simulation. Recommend using alignment mode to check the target line. Either mark your line of target on the ground or the net you are hitting into.
Tip: Use of alignment sticks/ golf clubs increases the accuracy of intended line of play.
Tip: Being too far above or below the hitting surface can affect consistent shot capture and ball flight data. Recommended laser distance 11 ½” to 12 ½”.
Tip: For optimum spin results, place the ball on the laser dot with some kind of marking on the golf ball, such as its brand logo, facing toward SkyTrak’s lens prior to hitting.
Where can I find the SkyTrak Golf Launch Monitor Manual?
Click here to see the SkyTrak Launch Monitor manual.
See more SkyTrak Golf Launch Monitor FAQs:
Click on this link for more SkyTrak Launch Monitor FAQ.
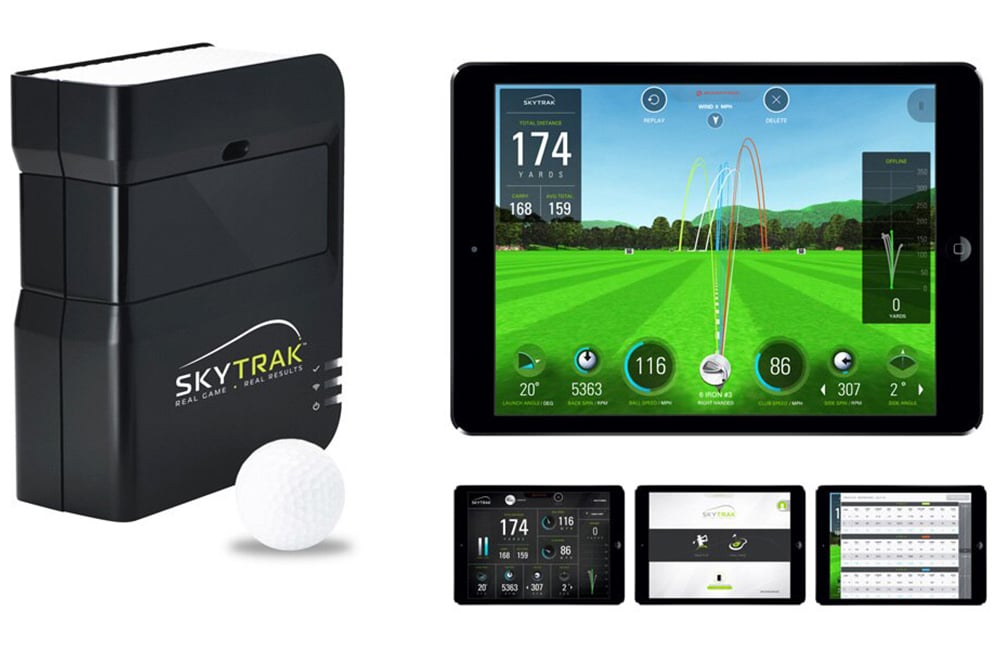
SkyTrak Launch Monitor Product Specifications
SKYTRAK UNIT
- Photometric launch monitor
- Accelerometer-based internal leveling system
- No calibration required
- Dimensions: 5.75in L x 6.75in H x 2.5in W
- Weight – 1.7lbs
LAUNCH DATA ACCURACY
- Ball Speed: 0-200mph +/- 1mph
- Launch Angle: 0-55° +/- 1°
- Back Spin: 0-12,000rpm +/- 250rpm
- Side Spin: 0-4,000rpm +/- 250rpm
- Side Angle: 0-20° +/- 2°
POWER AND BATTERY
- Built-in rechargeable lithium-ion battery
- Up to 5 hours of continuous use
- Micro USB charging cable included
WIRELESS CONNECTIVITY OPTIONS
- Connects directly to iPad Wi-Fi (NO Internet access in this mode)
- Connects to iPad Wi-Fi through router/home network (Internet Access available)
Click here for a full list of product specs.
Have a technical issue with a SkyGolf, SkyCaddie, or SkyTrak product? We'll help you get it figured out!
The first step we recommend is contacting SkyGolf's fantastic support team directly — this can be done in two ways:
- via Text Support: (601) 691-8693 (Mon-Fri, 8:00 a.m. to 5 p.m. CST
- via SkyGolf Help Center (skygolf.com/support)
As an Authorized SkyGolf Dealer, all SkyGolf, SkyTrak, and SkyCaddie products sold on PlayBetter.com are completely eligible for their 6-Month Customer Limited Warranty or the 1-Year Extended Warranty (if you purchased it). So you can be confident you'll be protected from any product defects within 6 months of your delivery date!
When you purchase a SkyTrak on PlayBetter.com, per manufacturer policy, all SkyTrak purchases are eligible for Free 60-Day Returns Only. Only shipment destinations within the United States are allowed. SkyTrak software subscriptions, once activated, are no longer eligible for return/refund. Any product that is purchased from PlayBetter and resold is no longer valid for returns. Return requests must be initiated by original buyer and accompanied by original purchase receipt. Any units registered to another customer name other than the original buyer will NOT be eligible for returns or exchanges.
The PlayBetter.com team is here to support you the entire way! So if you're not getting the help you need, please contact us via the Chat feature and we'll make sure you are completely taken care of!