Garmin Edge 130 Plus FAQs & SpecsUpdated 4 years ago
Table of Contents
Garmin Edge 130 Plus Tech Support
Garmin Edge 130 Plus FAQs
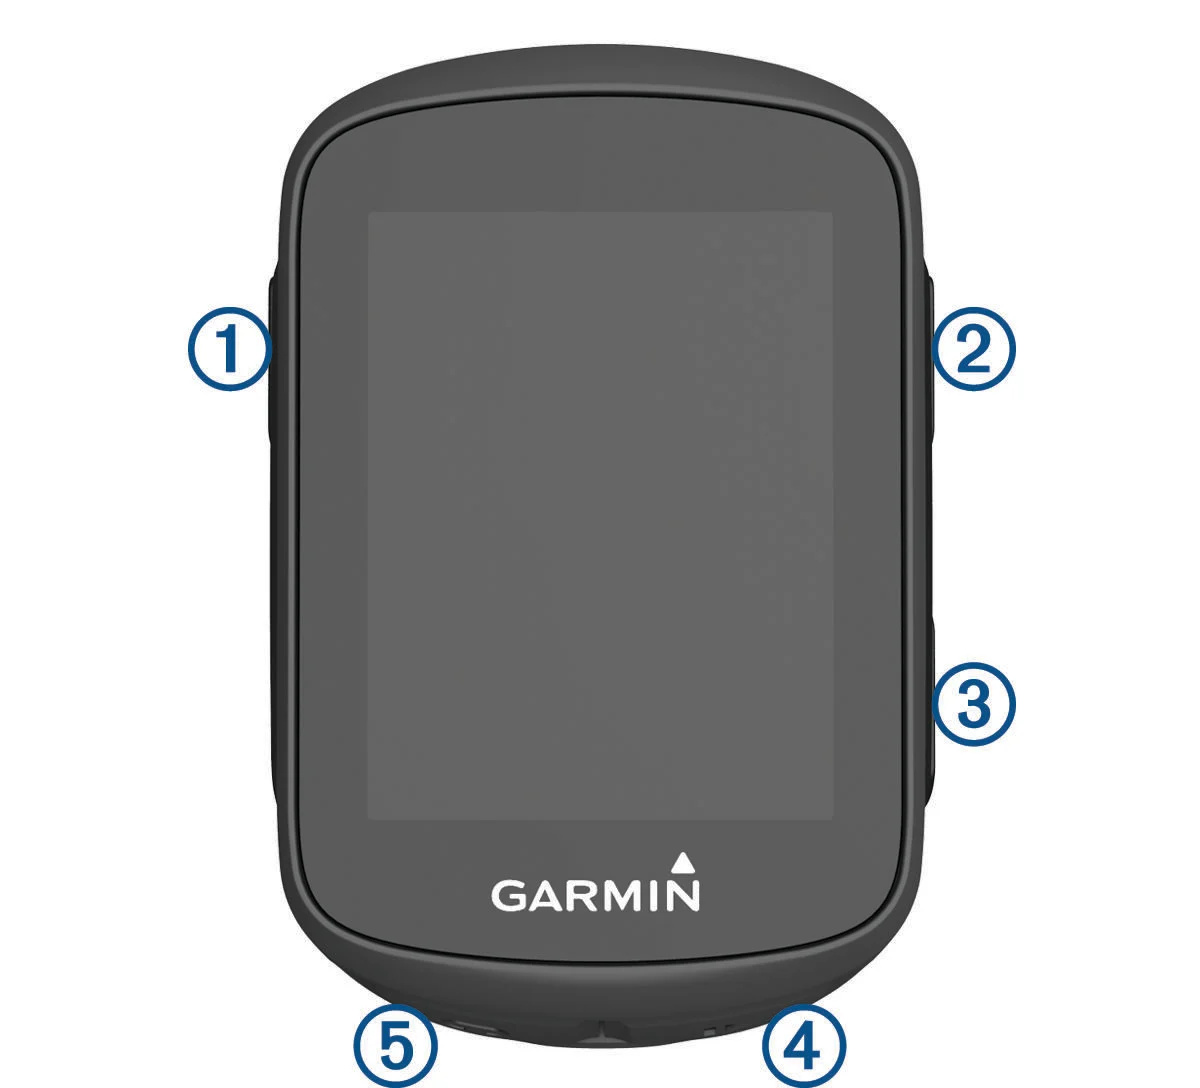
- Select to wake the device.
Hold to turn on and off. - Select to scroll through the data screens, options, and settings.
From the home screen, hold to view the device menu. - Select to scroll through the data screens, options, and settings.
From the home screen, hold to view the widgets. - Select to start and stop the timer.
Select to choose an option or to acknowledge a message. - Select to mark a new lap.
Select to return to the previous screen.
Status Icons
A solid icon means the signal was found or the sensor is connected.
| GPS status |
|---|---|
| Bluetooth® status |
Heart rate status | |
Power status | |
LiveTrack status | |
Speed and cadence status | |
| Sync in progress |


How to View Widgets
Your device comes preloaded with several widgets. You should pair your device with a smartphone to get the most of out your Edge® device.
- From the home screen, select
or
.
 The device scrolls through the widget loop.
 - While in an active widget, select
to view additional options for that widget.
How to Use the Shortcut Menu
Shortcut menu options are available to quickly access features or perform functions.
 appears on the screen, hold
 How to Pair Your Smartphone
To use the connected features of the Edge® device, it must be paired directly through the Garmin Connect™ app, instead of from the Bluetooth® settings on your smartphone.
- From the app store on your smartphone, install and open the Garmin Connect app.
- Hold
to turn on the device.
The first time you turn on the device, you will select the device language. The next screen prompts you to pair with your smartphone.
TIP: You can hold, and select Phone > Pair Phone to manually enter pairing mode.
- Select an option to add your device to your Garmin Connect account:
If this is the first device you have paired with the Garmin Connect app, follow the on-screen instructions.
If you have already paired another device with the Garmin Connect app, from the
or menu, select Garmin Devices > Add Device, and follow the on-screen instructions.
After you pair successfully, a message appears, and your device syncs automatically with your smartphone.
How to Install the Standard Mount
For the best GPS reception, position the bike mount so the front of the device is oriented toward the sky. You can install the bike mount on the stem or the handlebars.
- Select a secure location to mount the device where it does not interfere with the safe operation of your bike.
- Place the rubber disk
on the back of the bike mount.
The rubber tabs align with the back of the bike mount so it stays in place.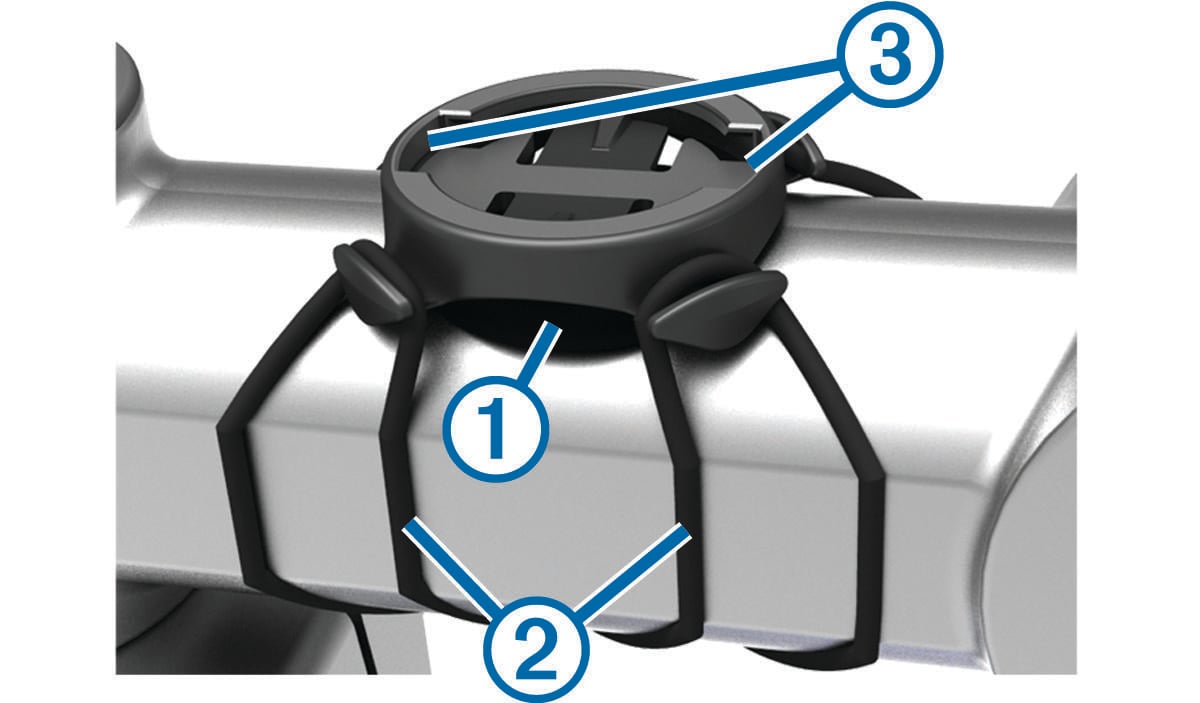
- Place the bike mount on the bike stem.
- Attach the bike mount securely using the two bands
 .
. - Align the tabs on the back of the device with the bike mount notches
.
- Press down slightly and turn the device clockwise until it locks into place.
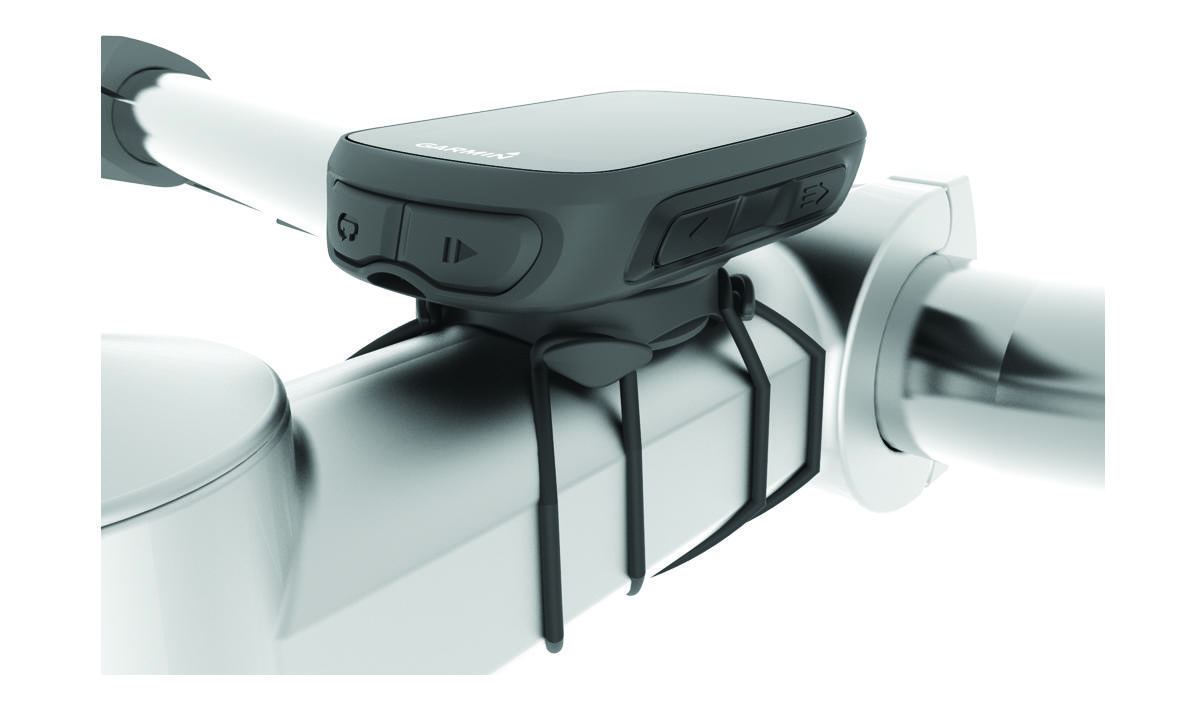
How to Install a Mountain Bike Mount
- Select a secure location to mount the Edge® device where it does not interfere with the safe operation of your bike.
- Use the 3 mm hex key to remove the screw
 from the handlebar connector (2).
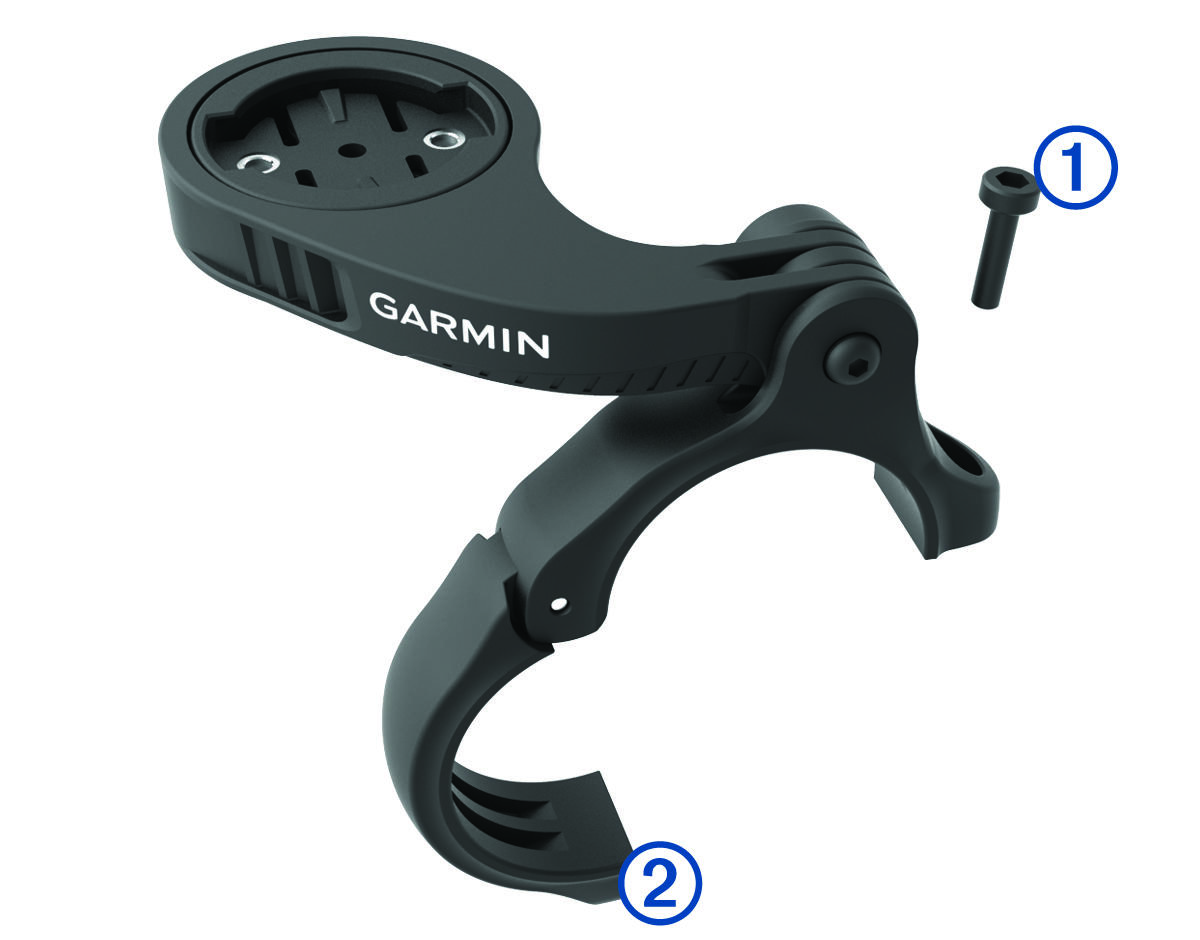
- Select an option:
If the handlebar diameter is 25.4 mm, place the thicker pad around the handlebar.
If the handlebar diameter is 31.8 mm, place the thinner pad around the handlebar.
If the handlebar diameter is 35 mm, do not use a rubber pad.
- Place the handlebar connector around the handlebar, so that the mount arm is above the bike stem.
- Use the 3 mm hex key to loosen the screw
on the mount arm, position the mount arm, and tighten the screw.
NOTE: Garmin® recommends tightening the screw so the mount arm is secure, with a maximum torque specification of 20 lbf-in. (2.26 N-m). You should check the tightness of the screw periodically.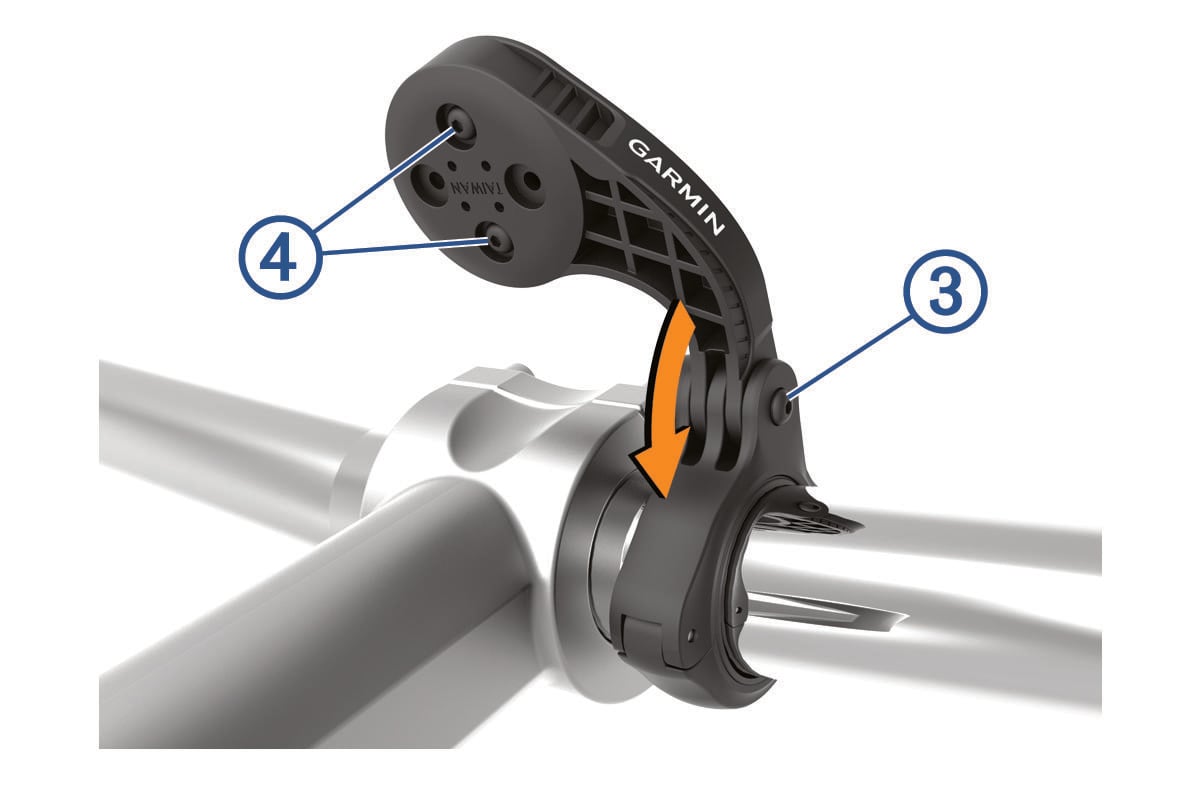
- If necessary, use the 2 mm hex key to remove the two screws on the back side of the mount
, remove and rotate the connector, and replace the screws to change the orientation of the mount.
- Replace and tighten the screw on the handlebar connector.NOTE: Garmin recommends tightening the screw so the mount is secure, with a maximum torque specification of 7 lbf-in. (0.8 N-m). You should check the tightness of the screw periodically.
- Align the tabs on the back of the Edge device with the bike mount notches
 .
.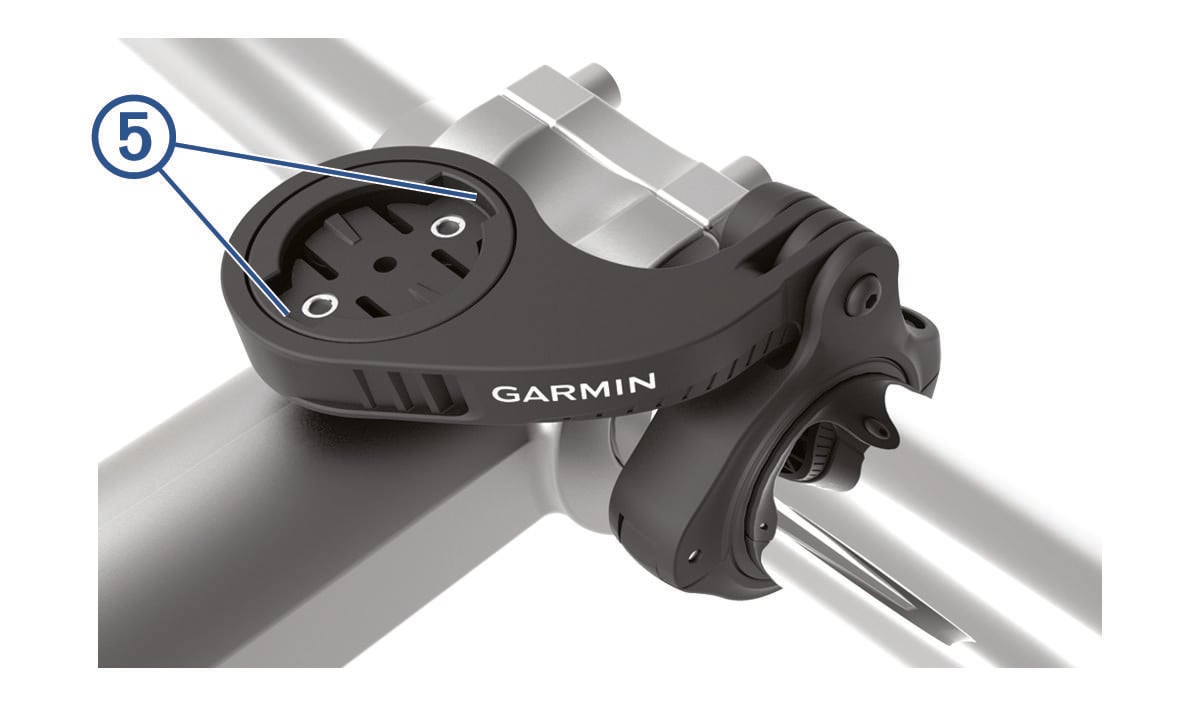
- Press down slightly and turn the Edge device clockwise until it locks into place.
Where can I find the Garmin Edge 130 Plus Manual?
Click here to see the Edge 130 Plus manual.
Garmin Edge 130 Plus Product Specifications
GENERAL
- PHYSICAL DIMENSIONS: 1.6” x 2.5” x 0.6” (41 x 63 x 16 mm)
- DISPLAY SIZE: 1.8" (45.0 mm) diagonal
- DISPLAY RESOLUTION: 303 x 230 pixels
- WEIGHT: 1.2 oz (33 g)
- BATTERY TYPE: rechargeable lithium-ion
- BATTERY LIFE: 12 hours
- WATER RATING: IPX7
View a full list of Edge 130 Plus specs.
Need further troubleshooting? No problem!
For further technical support, we recommend contacting Garmin's fantastic technical support team—this can be done in two ways:
- via Phone: 1-800-800-1020
- via Garmin Support Center (support.garmin.com)
As an Authorized Garmin dealer, any Edge 130 Plus sold on PlayBetter.com is completely eligible for Garmin's 1-Year Limited Manufacturer Warranty. So you can be confident you'll be protected from any product defects within 365 of your delivery date!
When you purchase an Edge 130 Plus on PlayBetter.com, you have 60 days to return or exchange it—no questions asked!
The PlayBetter.com team is here to support you the entire way! So if you're not getting the help you need, please contact us via Help Center (email, chat or phone) and we'll make sure you're taken care of.