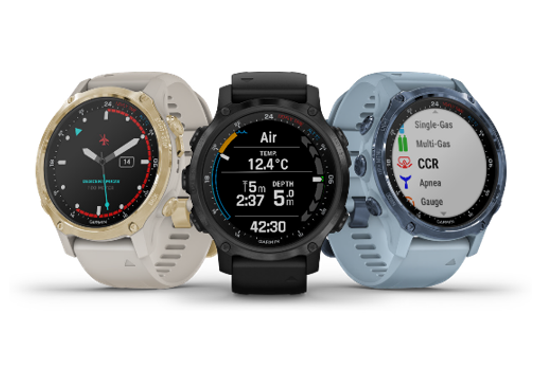
Garmin Descent Mk2/Mk2S/Mk2i FAQs & SpecsUpdated 4 years ago
Table of Contents
Garmin Descent Mk2/Mk2S/Mk2i FAQs
Garmin Descent Mk2/Mk2S/Mk2i Specs
Garmin Descent Mk2/Mk2S/Mk2i Tech Support
Garmin Descent Mk2/Mk2S/Mk2i FAQs
How do I set up my Descent Mk2 watch?
When powering on the Descent Mk2 for the first time, you'll be prompted to configure your user setting and preferences on the watch. These settings can be changed at any time.
1.Power on the Descent Mk2 by holding Light
2. Choose your language by scrolling through the list using Up and Down, press Start to select the language
3. Pair the watch to your smartphone with the Garmin Connect App (optional)
4. Proceed through the onscreen prompts to select your preferences and user settings
5. Setup the Activity Menu by selecting your favorites (optional)
- Press Start to access the Activity Menu
- Use Up and Down to scroll through the list of available activity types
- Press Start to select each activity you wish to use
- Select Done when finished
How do I set up which notifications display on my Descent Mk2/Mk2S/Mk2i watch?
Controlling which notifications you see on your Garmin device is managed from your phone. Steps differ between Apple and Android.
Apple
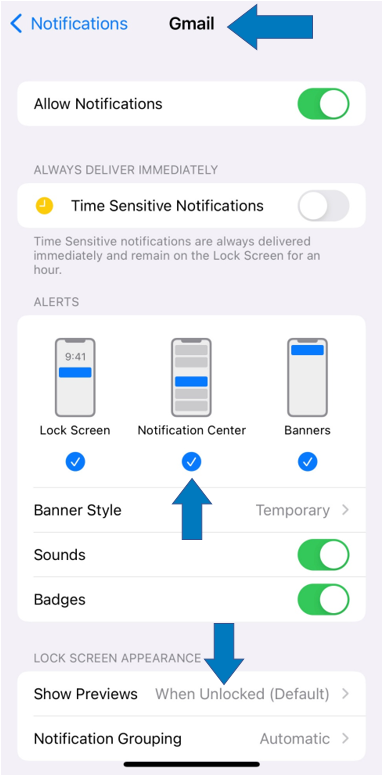
Notifications are managed from the iOS notification setting on the phone.
- From the iPone select Settings.
- Select Notifications.
- From the top of the screen, make sure Show Previews is set to Always or When Unlocked. This is a setting required by Apple to display notifications on a Bluetooth paired device.
- A little farther down the screen, under NOTIFICATION STYLE, select the app you want to configure (e.g., Messages, Mail, etc.).
- To SEE NOTIFICATIONS for a specific app on your Garmin device:
- Allow Notifications should be toggled on.
- Under ALERTS, make sure there is a check mark under Notification Center.
- At the bottom, under OPTIONS or LOCK SCREEN APPEARANCE, you must have Show Previews set to either Always or When Unlocked. This is a setting required by Apple to display notifications on a Bluetooth paired device.
- To DISABLE NOTIFICATIONS from displaying on your Garmin device:
- Choose the app you want to control from the NOTIFICATIONS SETTINGS screen.
- Under ALERTS, uncheck Notification Center. This will also result in notifications no longer appearing in the phone's notifications no longer appearing in the phone's notification center.
Repeat step 4 for each individual app to either allow or disable notifications from the app.
Android
Controlling what notifications display on your Garmin device can be managed from the Garmin Connect app.
- Open the Garmin Connect app on your phone.
- Select menu bars (top left).
- Select Settings.
- Select Notifications.
- Select App Notifications.
From here, toggle to enable or disable all smart notifications or customize by selecting individual apps.
Why is the Weather Widget not displaying any weather information?
Weather data not displaying can present itself in a few different ways:
- Weather data is not available message
- Waiting for data message
- Widget may display an exclamation icon
Common Troubleshooting Steps
- Confirm the Garmin device is paired and connected to the phone through the Garmin Connect app.
- Confirm the Bluetooth setting on your smartphone and your Garmin device is turned on.
- For GPS capable Garmin devices, start an outdoor activity and briefly step outdoors to acquire GPS signal.
- For Apple phones, make sure the Garmin Connect app is open and/or running in the background. The app can be minimized but, it must remain open in the background to receive weather information.
- Confirm that the Location permissions for Garmin Connect are set properly.
Why is the Weather Widget showing incorrect weather data?
The accuracy of the weather data displayed on a Garmin watch or Edge bike computer can vary depending on several factors:
- Garmin devices request weather data once every 20 minutes at most. Make sure to sync your device to refresh the most up to date weather data.
- The weather forecast on a Garmin device can appear less accurate than the current temperature if the data is stale and has not been updated recently.
Common Troubleshooting Steps:
- Make sure to leave the Garmin Connect app running in the background on your phone. Closing the app can prevent weather data from being retrieved.
- Make sure to have the correct units of measure setting on your Garmin device (Fahrenheit vs. Celsius). Refer to your owner's manual to learn where you can change your Units setting.
- Confirm that the Location permissions for Garmin Connect are set properly.
What is the Dive Algorithm on Garmin Dive Computers?
When diving it is important to understand how pressure is affecting the body, and how the effects of pressure are calculated.
Garmin dive computers use the Bühlmann ZHL-16C Algorithm, which takes into account current depth, current time, and current breathing gas to output to determine how gasses enter and exit the body due to pressure changes. Conservatism can be set by the diver.
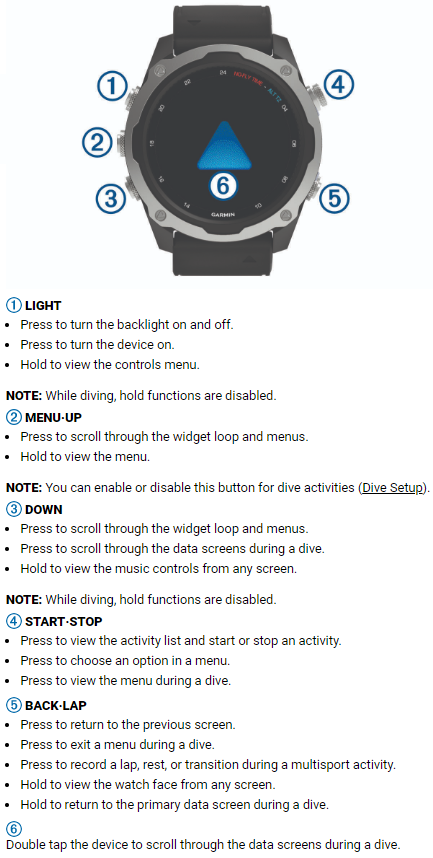
How to use Pool Dive Mode
When the device is in pool dive mode, the tissue load and decompression lockout features function normally, but dives are not saved to the dive log.
- Hold LIGHT to view the controls menu.
- Select
.
The pool dive mode turns off automatically at midnight.
How to set CCR Setpoints
You can configure the high and low partial pressure of oxygen (PO2) setpoints for closed-circuit rebreather (CCR) dives.
- Hold MENU.
- Select Dive Setup > CCR Setpoints.
- Select an option:
To configure the lower PO2 setpoint, select Low Setpoint.
To configure the upper PO2 setpoint, select High Setpoint.
- Select Mode.
- Select an option:
To automatically change the setpoint based on your current depth, select Auto.
NOTE: For example, if you descend through the high setpoint depth or ascend through the low setpoint depth, the PO2 threshold switches to the high or low setpoint, respectively. Automatic setpoint depths must be at least 6.1 m (20 ft.) apart.To manually change setpoints during a dive, select Manual.
NOTE: If you manually change setpoints within 1.8 m (6 ft.) of an automatic switch depth, then automatic setpoint switching is disabled until you are more than 1.8 m (6 ft.) above or below the automatic switch depth. This prevents unintended setpoint switching.
- Select PO2, and enter a value.
- If necessary, select Depth, and enter a depth value for the automatic setpoint change.
Where can I find the Garmin Descent Mk2/Mk2S/Mk2i Manual?
Click here to see the Descent Mk2/Mk2S/Mk2i manual.
See more Descent Mk2/Mk2S/Mk2i FAQs:
Click on this link for more Descent Mk2/Mk2S/Mk2i FAQs.
Garmin Descent Mk2/Mk2S/Mk2i Product Specifications
GENERAL
- LENS MATERIAL: sapphire crystal
- BEZEL MATERIAL: stainless steel
- CASE MATERIAL: fiber-reinforced polymer
- QUICKFIT™ WATCH BAND COMPATIBLE: yes (20 mm)
- STRAP MATERIAL: silicone
- PHYSICAL SIZE: 43 x 43 x 14.15 mm
- DISPLAY SIZE: 1.2” (30.4 mm) diameter
- DISPLAY RESOLUTION: 240 x 240 pixels
- DISPLAY TYPE: sunlight-visible, transflective memory-in-pixel (MIP)
- WEIGHT: silicone band: 60 g; case only: 41 g
- BATTERY LIFE: Smartwatch: Up to 7 days
View a full list of Descent Mk2/Mk2S/Mk2i specs.
Need further troubleshooting? No problem!
For further technical support, we recommend contacting Garmin's fantastic technical support team—this can be done in two ways:
- via Phone: 1-800-800-1020
- via Garmin Support Center (support.garmin.com)
As an Authorized Garmin dealer, any Descent Mk2/Mk2S/Mk2i sold on PlayBetter.com is completely eligible for Garmin's 1-Year Limited Manufacturer Warranty. So you can be confident you'll be protected from any product defects within 365 of your delivery date!
When you purchase a Descent Mk2/Mk2S/Mk2i on PlayBetter.com, you have 60 days to return or exchange it—no questions asked!
The PlayBetter.com team is here to support you the entire way! So if you're not getting the help you need, please contact us via Help Center (email, chat or phone) and we'll make sure you're taken care of.