Garmin Approach R10 FAQs & SpecsUpdated 4 years ago
Table of Contents
Garmin Approach R10 Tech Support
Garmin Approach R10 FAQs
Tips for Indoor or Outdoor Approach R10 Placement
Before calibrating the Approach R10 you should first look into the placement of the Approach R10, as well as your surroundings, can impact the accuracy of the radar. For the best experience possible, there are some tips and best practices to be aware of.
Ideal Conditions for Indoor or Outdoor Use
- Some concrete surfaces and structures may impact performance.
- When using the Approach R10 near concrete, such as in a unfinished basement or garage floor, covering concrete with carpet or cloth may improve accuracy. Concrete surfaces can cause radar signals to reflect back incorrectly.
- Objects may impact performance.
- When preparing your hitting area, remove objects, such as fans, from your surroundings when necessary. Objects could cause radar signals to reflect back incorrectly.
- Use the tripod stand that came with the Approach R10. Using other mounts, or attempting to attach it to a wall, could result in inaccurate readings or errors due to the tilt.
- If Approach R10 is tilted slightly, it will compensate for this automatically during your session.
- There should be an unobstructed view from the Approach R10 to the ball.
- When using a mat, or if the tee box is raised, the Approach R10 should have a full clear view of the ball. You may place a wood block or book under the Approach R10 when necessary.
- If the tee box is raised, the Approach R10 should also be raised. Place a wood block or book under the Approach R10 when necessary.
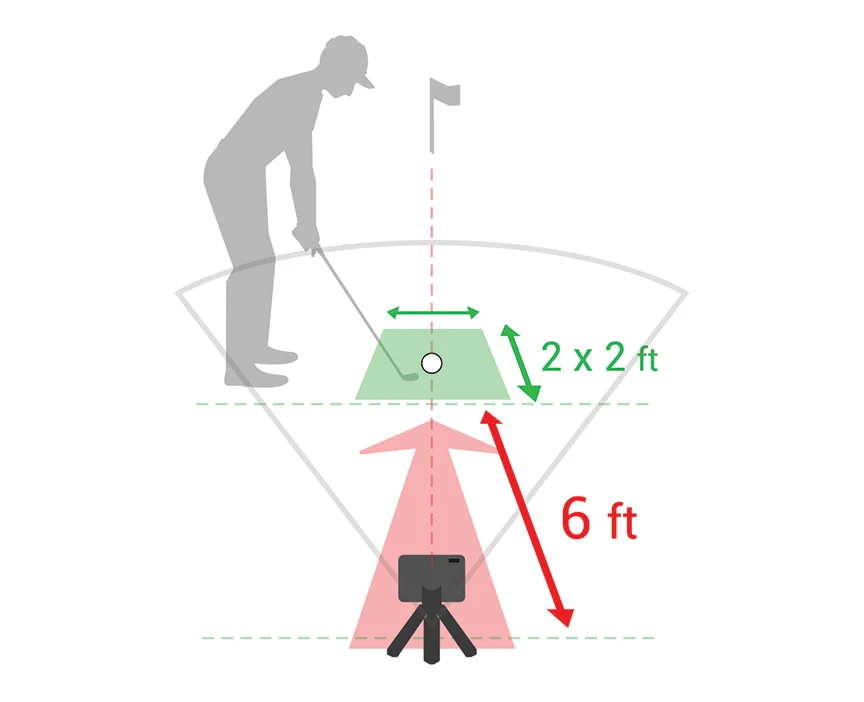
- The ideal location of the Approach R10 is 7ft (2.1m) behind the ball and adjust the device so the red alignment line is aligned with the golf ball and the target of the shot.
Important Notes for Use Indoors
- Make sure that you have enough ceiling height to swing your clubs.
- The room should be at least 15 ft. long x 8 ft. wide x 8 ft. high (4.6 m x 2.4 m x 2.4 m).
- Have a setup where you are confident to take a full normal swing. If not you may see short distances.
- When using a net, make sure the ball is at least 8 ft. (2.4 m) away from the net. However, using a longer distance could improve accuracy.
- Use carpet, artificial turf or fabric to cover the area between the Approach R10 and hitting surface.
Important Notes for Use Outdoors
- Have a setup where you are confident to take a full normal swing. If not you may see short distances.
- When using a net, make sure the ball is at least 8 ft. (2.4 m) away from the net. However, using a longer distance could improve accuracy.
- Nearby golfers might cause interference with the R10's radar. If there are side by side hitting bays, try to leave space on both sides when possible.
Calibrating the Approach R10
NOTE: Garmin Golf app version 2.1.1 or later is required.
There some instances that a calibration is needed.
- If your distance and launch angle are consistently inaccurate, calibrate.
- Calibrate when all of the above suggestions have not resolved your consistently inaccurate data.
How to Calibrate
- Open the Garmin Golf app.
- Select
(Android) or More (iOS).
- Select Garmin Devices.
- Select Calibrate.
NOTE: Ensure that the Approach R10 is on a level surface using a level. If you do not have a level, you could use a level app on your phone. This tool will not be needed after you complete the calibration. - Select Calibrate.
- Select Done.
Can I use the Approach R10 in low lighting?
Yes. The device uses radar to detect your shots, so the lighting does not have any effect. However, lighting will be needed for Swing Capture recording.
Will I need special tools to setup my Approach R10?
No. You can use two clubs to measure close to the 6-8 ft. distance or use a measuring tape.
Do I need a perfectly level floor or surface?
No. The Approach R10 compensates for some degree of tilt. If the tilt is too great, the Garmin Golf app will will alert you on your first swing.
Should the Approach R10 be raised from the ground?
This depends on the setup. If the surface the ball is on is raised, then the bottom of the Approach R10 (above the tripod) needs to be above the surface the ball is placed on.
How to Prepare for a Shot
NOTE: A Garmin Golf membership is required to play virtual rounds.
- Place the ball at the desired tee location
NOTE: The tee location must be at least 8 ft. (2.4 m) away from the net when playing indoors - Attach the device to the tripod mount (see Installing the Magnetic Tripod Mount)
- Place the device on the ground between 6 ft. and 8 ft. (1.8 m and 2.4 m) behind the ball
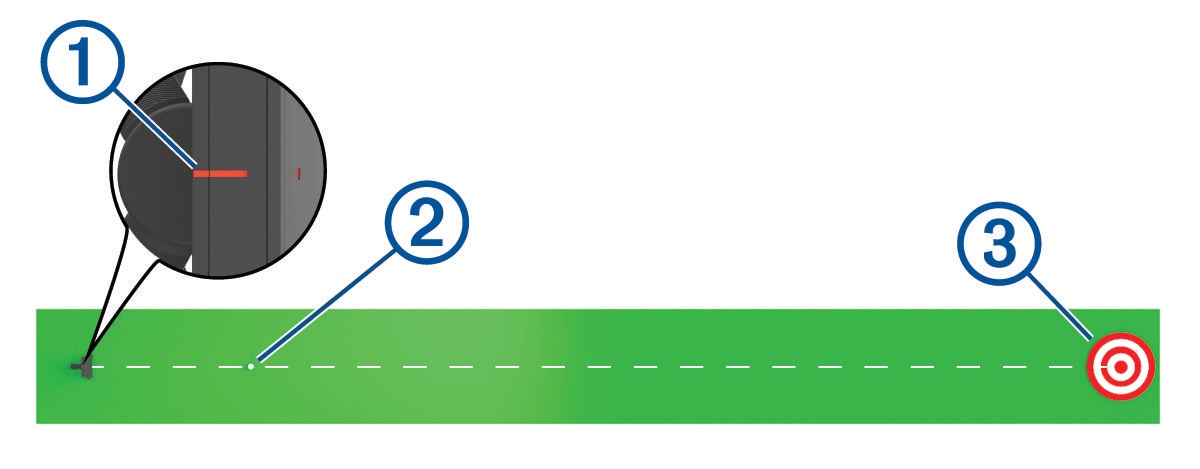
NOTE: If you are using a golf mat, make sure the bottom edge of the device sits above the mat - Adjust the device so the red alignment line
is aligned with the golf ball
and the target of the shot
TIP: You can lay a golf club on the ground between the alignment line and golf ball to confirm they are lined up
- Press the button to turn on the device
- Start a golf simulator game mode
- Wait for the status LED to begin flashing green, and take a shot
How to Use the Garmin Golf App on a Projector or TV Screen
With the purchase of the Approach R10 launch monitor you can unlock the Garmin Golf Simulator. This allows you to simulate a driving range and play virtual courses in Home Tee Hero.1
Your mobile device can be mirrored or casted to smart TVs. This method of viewing the Garmin Golf app, in some cases, may not be ideal since the display resolutions on phones will be different than most projection screens or TVs, but the following support articles provide information on how to wirelessly mirror your phone's display to a compatible device:
- iOS: Apple Support: Mirror the screen on your iOS device
- Android: Chromecast Help: Cast your Android screen from the Google Home app
1 Home Tee Hero requires the Garmin Golf app membership subscription.
Where can I find the Garmin Approach R10 Manual?
Click here to see the Approach R10 manual.
See more Approach R10 FAQs:
Click on this link for more R10 FAQs.
Garmin Approach R10 Product Specifications
GENERAL
PHYSICAL DIMENSIONS: 3.5" x 2.8" x 1" (88.5 x 70.25 x 25 mm) without tripod
WEIGHT: Without tripod: 5.22 oz (148 g) With tripod: 7.79 oz (220.8 g)
BATTERY TYPE: internal rechargeable lithium-ion
BATTERY LIFE: up to 10 hours
WATER RATING: IPX7 (Withstands incidental exposure to water of up to 1 meter for up to 30 minutes and splashes, rain or snow, showering)
INTERFACE: USB
DAILY SMART FEATURES
SMARTPHONE COMPATIBILITY
PAIRS WITH GARMIN GOLF APP
View a full list of Approach R10 specs.
Need further troubleshooting? No problem!
For further technical support, we recommend contacting Garmin's fantastic technical support team—this can be done in two ways:
- via Phone: 1-800-800-1020
- via Garmin Support Center (support.garmin.com)
As an Authorized Garmin dealer, any Approach R10 sold on PlayBetter.com is completely eligible for Garmin's 1-Year Limited Manufacturer Warranty. So you can be confident you'll be protected from any product defects within 365 of your delivery date!
When you purchase an Approach R10 on PlayBetter.com, you have 60 days to return or exchange it—no questions asked!
The PlayBetter.com team is here to support you the entire way! So if you're not getting the help you need, please contact us via Help Center (email, chat or phone) and we'll make sure you're taken care of.